Use Nerves and a little reverse engineering to control a motorized desk. Then intercept current height messages from the controller and publish to a Phoenix site for real-time desk height measurements…because #yolo.
The idea
I’m fairly obsessed with automating my home and things around me. With nerves, that has become even easier and much more cost effective. But most of my recent work has been pretty binary - turning relay on/off, reading a sensor is on/off, reading the temperature, etc etc. I wanted to branch out a bit and try to directly interface with an existing component in my house. Something that is it’s own controller and has its own message system.
One day I leaned back to take a break from work, looked over at my Uplift Desk Advanced Digital Memory Keypad for my sit/stand desk and it hit me - “I bet I could control that with nerves…” 🤔
And thus this project was born (albeit useless as it is…)
Interfacing with the desk
Mine is a 2-leg model from Uplift Desk which has their standard [Smart Control Box] (https://www.upliftdesk.com/desk-control-box-for-2-leg-3-leg-or-4-leg-desks/). The description states it “Houses the ‘brain’ of your UPLIFT Desk” along with other settings like motor speed, min/max heights, and saved height memory. Which is great because that means the Advanced Digital Memory Keypad is essentially just a simple microcontroller receiving and sending messages with “the brain”, so we can intercept there with the nerves controller.
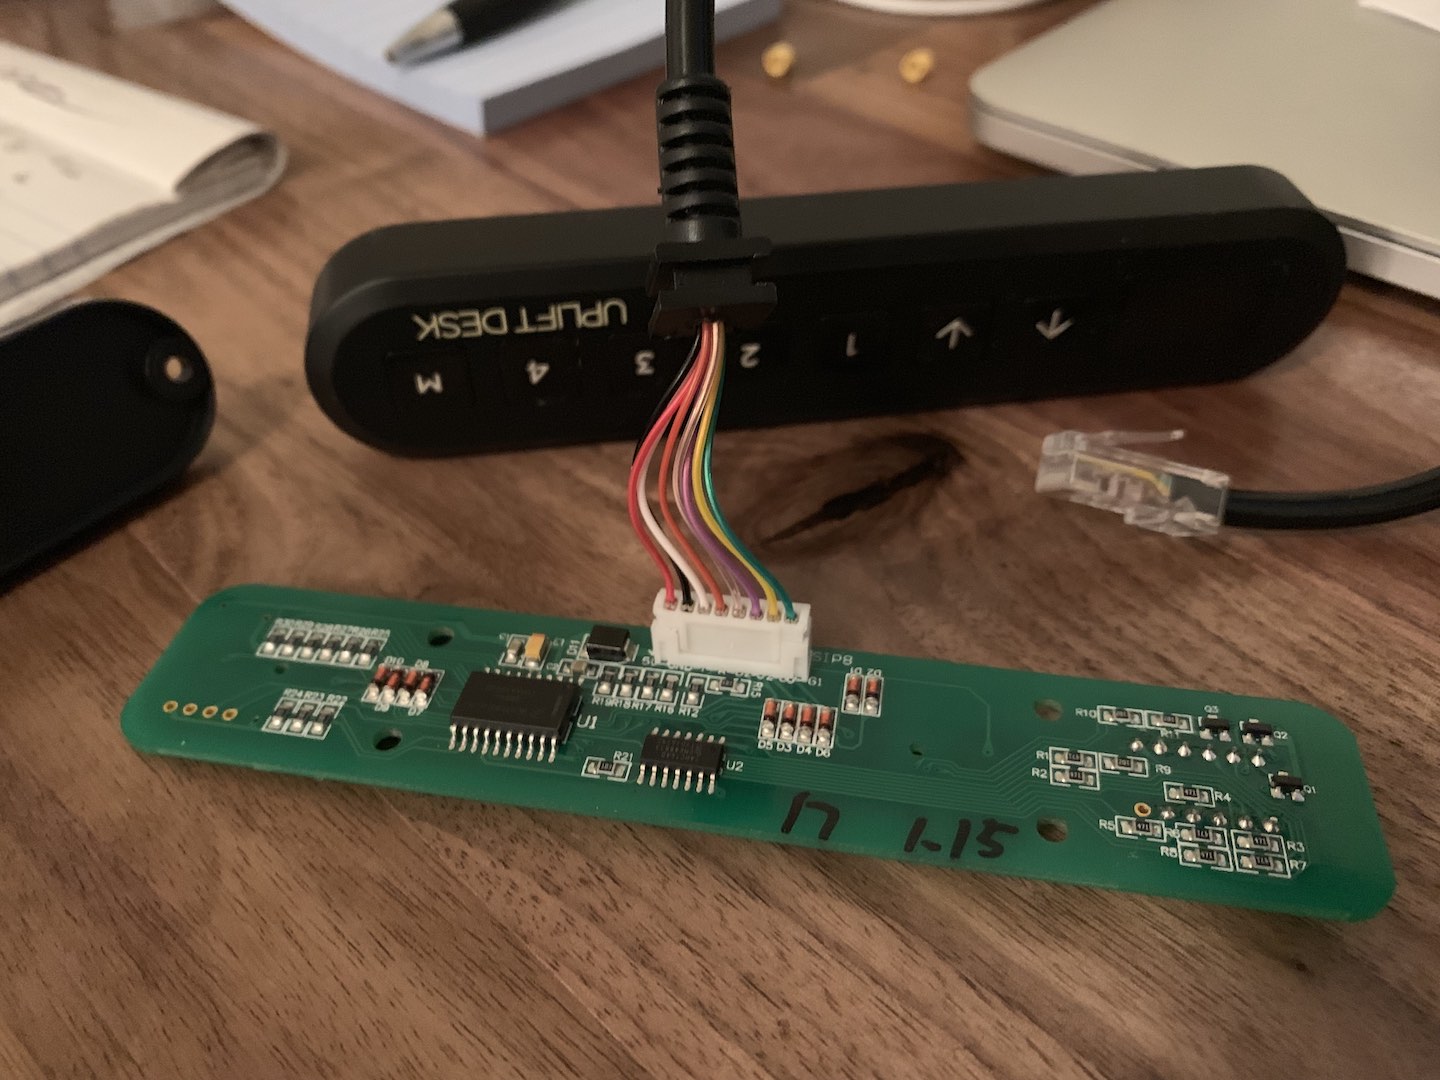
The keypad connects to the desk controller via a RJ45 jack and looks like a
typical ethernet cable with an 8-wire pinout. So I took apart to see what the
connector looked like for those 8 wires and was pleasantly surprised. The wires
were clearly colored and the PCB had a label for each one so I was able to
immediately identify 5V, GND, and G1. The other wire labels were mostly
covered by the connector, but I was able to make out T, R, and G0 as well.
So I set out with a multimeter to map out the wires as best I could. T/R
were most likely short for Tx/Rx and would be the communication with the
controller, so I skipped those for now. Here’s the final pinout I came up with:
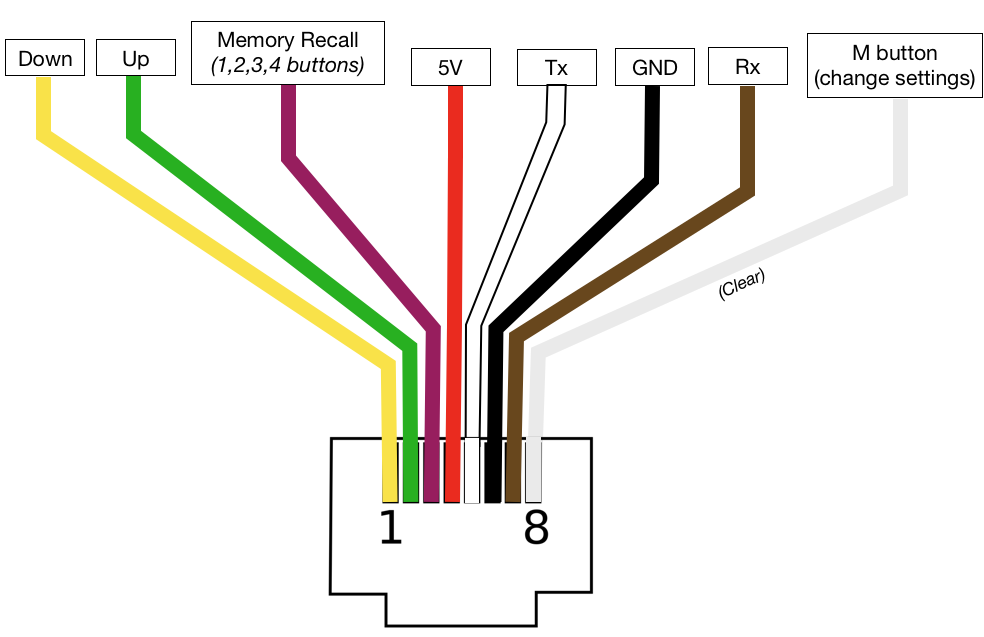
Moving the desk is simply just connecting the yellow or green wire to GND. So that can be easily done by toggling a GPIO pin between HIGH (1) and LOW (0) using Circuits.GPIO.
# setting LOW will move the desk in whatever direction the pin is for
# Be sure to initialize with HIGH to prevent moving on pin open.
{:ok, up_pin} = Circuits.GPIO.open(23, :output, initial_value: 1)
{:ok, down_pin} = Circuits.GPIO.open(24, :output, initial_value: 1)

# set LOW to move up and back down
Circuits.GPIO.write(up_pin, 0) # start moving
:timer.sleep(500)
Circuits.GPIO.write(up_pin, 1) # stop moving

Circuits.GPIO.write(down_pin, 0) # start moving
:timer.sleep(500)
Circuits.GPIO.write(down_pin, 1) # stop moving
Reading the messages
Now comes the fun part and ultimate goal of this project: reading the messages from the controller for the current height.
Initially, I connected the Tx(white) and Rx(brown) wires to my computer via
USB to TTL serial cable I had around and
used screen in my terminal to see what these messages would even look like.
It was just jibberish and repeating characters, but at least there were
messages! I tried lots of different baud rates thinking maybe thats was causing
the garbled mess, but I’m not really proficient with screen and serial
communication so I gave up there.
Instead I decided to connect the wires to the corresponding UART pins on my rpi3 and used yet another fancy library, Circuits.UART. From there, I could open UART port and see if I get better messages there.
{:ok, uart} = Circuits.UART.start_link
# Open UART to send messages to current process
:ok = Circuits.UART.open(uart, "ttyAMA0")

# Move the desk a little bit and flush the messages
flush
This exploded with messages!
{:circuits_uart, "ttyAMA0", <<255>>}
{:circuits_uart, "ttyAMA0", <<1>>}
{:circuits_uart, "ttyAMA0", <<1>>}
{:circuits_uart, "ttyAMA0", <<0>>}
{:circuits_uart, "ttyAMA0", <<253>>}
{:circuits_uart, "ttyAMA0", <<1>>}
{:circuits_uart, "ttyAMA0", <<1>>}
{:circuits_uart, "ttyAMA0", <<0>>}
{:circuits_uart, "ttyAMA0", <<254>>}
{:circuits_uart, "ttyAMA0", <<1>>}
{:circuits_uart, "ttyAMA0", <<5>>}
{:circuits_uart, "ttyAMA0", <<1>>}
{:circuits_uart, "ttyAMA0", <<0>>}
...# repeated x100
It was a bit overwhelming and confusing. There were hundreds of messages for just simple movements and I was having trouble finding a pattern. I ended up pinging the always helpful folks in the Nerves slack channel which ultimately advised me to get a logic analyzer to look at the messages (the Nerves Forum is also a great place to get help). Specifically, I got the one from Saleae. Once that was wired up, I still got the same binary messages, in groups of 4 bytes.
1, 1, 0, 253
1, 1, 0, 253
1, 1, 0, 254
1, 1, 0, 255
1, 1, 1, 0
Then it clicked: Serial data can be framed differently. And Circuits.UART can
handle framing. And there is a Circuits.UART.Framing.FourByte
module to handle this exact case. So really, I didn’t need a full blown logic
analyzer 🤦♂. Next time I’ll need it 😉…
So now that I can frame it, we just need to decipher what it means. I’ll save you the trouble. It’s actually a lot simpler than I thought…
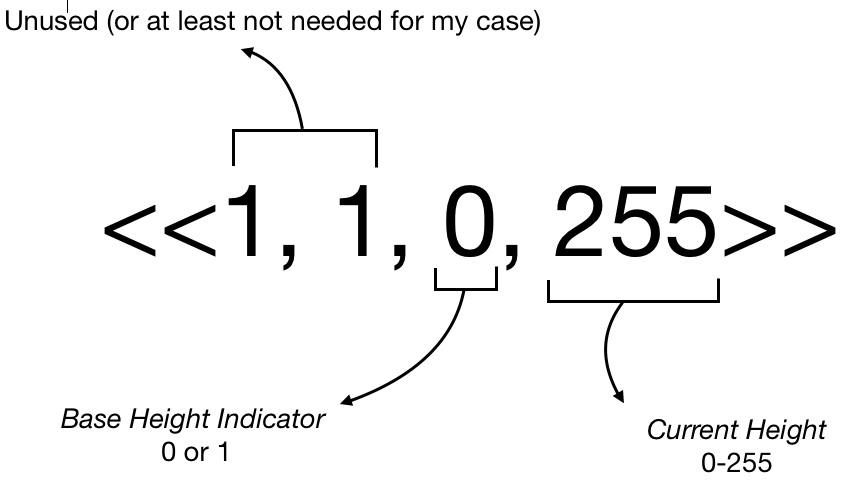
The height is the result of Base height indicator + Current Height and converting
to a number with 1 decimal place. So this heigh would be 0 + 255 = 25.5 inches.
My desk can go up to 50.0 inches in height, but the largest decimal number you can
represent in 8 bits is 255. Thats where the Base Height Indicator comes in. If
that is 1, then the base height is 256 (or 255 + 1).
In fact, this concept is called endianness which describes the order bytes are arranged into large numerical values when transmitted. Specifically, this is big-endian since the most significant byte is at the end of the address. (Big thanks to Frank Hunleth for pointing out this TIL gem)
With this, we can now easily calculate height from the messages like so:
{:circuits_uart, "ttyAMA0", <<1, 1, 0, 253>>}
# 0 + 253 = 253 or 25.3 as decimal

{:circuits_uart, "ttyAMA0", <<1, 1, 1, 0>>}
# 1 + 255 + 0 = 256 or 25.6

{:circuits_uart, "ttyAMA0", <<1, 1, 1, 53>>}
# 1 + 255 + 53 = 309 or 30.9

# We can also match the last 2 bytes to get the big-endian value
# then divide by 10 to get the float
{:circuits_uart, "ttyAMA0", <<1, 1, height::size(16)>>}
30.6 = height/10
Now we can put that all together in a nice little GenServer module to handle the height messages we care about and ignore all others. Then calculate the current height and report it somewhere:
defmodule Controller.Reader do
  use GenServer
  alias Circuits.UART
  require Logger

  def start_link(state) when is_list(state), do: start_link(Map.new(state))
  def start_link(state) when is_map(state) do
    state = state
            |> Map.put_new(:port, "ttyAMA0")
            |> Map.put(:current_height, "25.3") # Arbitrary default height (my current minimum allowed height)
    GenServer.start_link(__MODULE__, state, name: __MODULE__)
  end

  def init(state) do
    send self(), :init
    {:ok, state}
  end

  def handle_info(:init, %{port: port} = state) do
    {:ok, uart} = UART.start_link()
    :ok = UART.open(uart, port, framing: UART.Framing.FourByte, rx_framing_timeout: 10)
    {:noreply, Map.put(state, :uart, uart)} # just for reference
  end

  def handle_info({:circuits_uart, name, <<1, 1, height::size(16)>>}, %{port: port} = state) when name == port do
    # converts the 16-bit big-endian integer to the height as a float
    # i.e. 306 / 10 = 30.6
    new_height = height / 10

    # We could could lots of messages with the same height, so only report changes here
    if new_height != state.current_height do
      Logger.info(new_height)
      # This is where I report, but commenting out so it can compile for you
      # send Controller.Reporter, {:height_update, new_height}
    end

    {:noreply, %{state | current_height: new_height}}
  end

  # ignore messages we don't care about
  def handle_info({:circuits_uart, _, _}, state), do: {:noreply, state}
end
Publish it
The world obviously wants to know the current height of my desk, so I also made a website that my controller reports to anytime there is a height change. The site uses Phoenix to handle websocket connections with the controller and browser sessions, and Drab to update the view in real time on the backend when the socket reports height change. You can see the reporting code at here.
It’s not special, but you can check it out at: https://dudewheresmydesk.live
Fin
To finish, I broke this all out into a breadboard and wired to keypad as well as the rpi3 controller so I could still use both options.
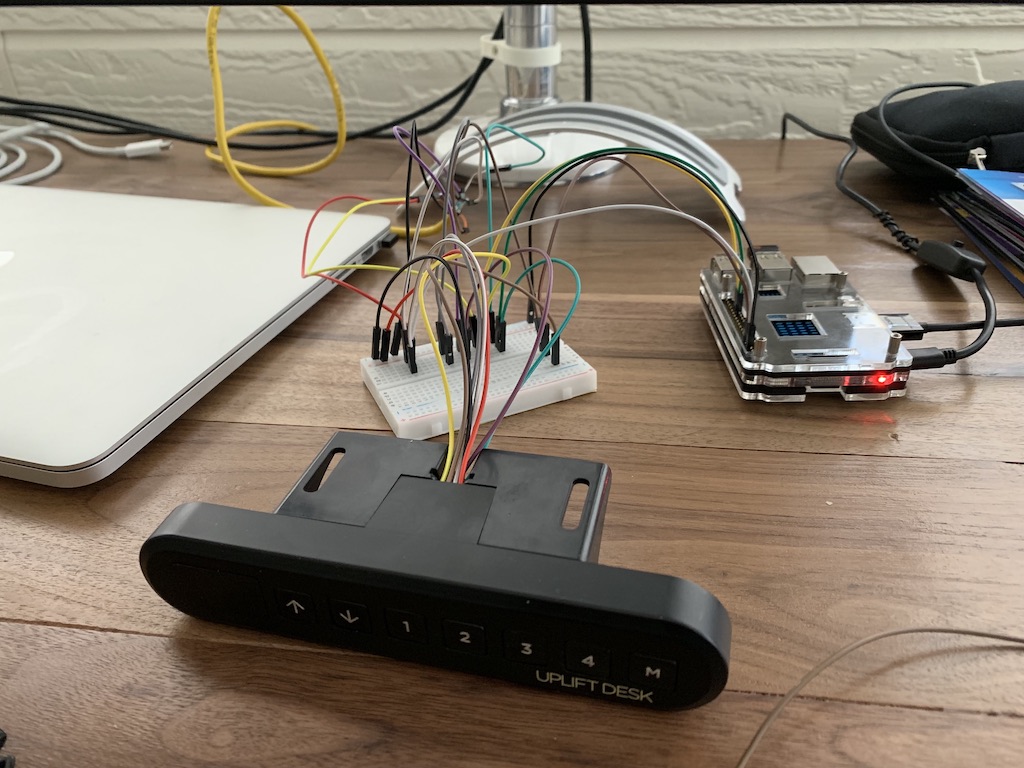
All of the code for the controller and website is available at github.com/jjcarstens/desk if you want to try yourself.
There’s really not much use-case for this, but it was definitely fun. My hope is that it helps remove some fear of working with hardware and encourage others to take the dive and try it out. There are lots of fun projects to do in hardware and nerves help make that a little easier.
I’ve got quite a few more projects for Nerves at Home, so if you liked this then keep on the lookout for more to come.
Also, feel free to reach out if you want to collaborate on fun Nerves at Home projects. Or join us at Nerves Remote Meetup where we basically just talk about random hardware projects we’re all working on and pass around ideas.
Until then… 🎉 🍹 🌴 👋